|
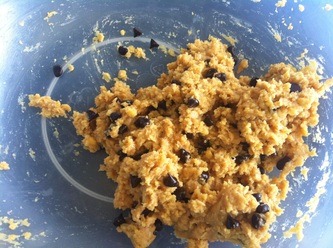
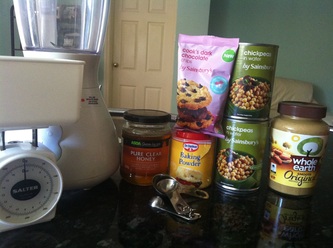
Ok so I am SUPER excited about this recipe that I just tried out and have to share it with all of you! It is perfect if you are coeliac/ have a gluten intolerance and they are relatively healthy as there is no sugar, no flour, no oil, and no eggs! I saw the recipe from Jump on the Skinny Bandwagon circulating around Facebook and I am always intrigued by recipes that substitute certain ingredients for ones that you would never think of (such as cauliflower pizza dough). Here is the recipe as copied from the circulating status on Facebook. See below for my notes and things I did differently: Ingredients: 1 1/4 cups canned* chickpeas, well-rinsed and patted dry with a paper towel 2 teaspoons vanilla extract 1/2 cup + 2 tablespoons (165 grams) natural peanut butter (can use PB2 from gym to make healthier, check your labels ) 1/4 cup (80 grams) honey (agave would be amazing too!) 1 teaspoon baking powder** a pinch of salt if your peanut butter doesn’t have salt in it 1/2 cup (90 grams) chocolate chips * My can was a 400 gram can, 240 grams without the water, and I used all but a few tablespoons ** If you need grain-free baking powder, you can use 1 part cream of tartar + 1 part baking soda + 2 parts arrowroot. Directions: Preheat your oven to 350°F / 175°C. Combine all the ingredients, except for the chocolate chips, in a food processor and process until very smooth. Make sure to scrape the sides and the top to get the little chunks of chickpeas and process again until they’re combined. Put in the chocolate chips and stir it if you can, or pulse it once or twice. The mixture will be very thick and sticky. With wet hands, form into 1 1/2″ balls. Place onto a piece of parchment paper. If you want them to look more like normal cookies, press down slightly on the balls. They don’t do much rising. Bake for about 10 minutes. Yields about fourteen 1 1/2″ cookie dough balls. My notes and things I did differently: First of all, I don't have a food processor so what I did is I used a blender (you can also use a magic bullet) to grind up/puree the chick peas. But you have to make sure to only do a little bit at a time as if you put in too many chick peas, the blade won't be able to grind them all. So out of the total amount of chick peas used, I divided them into about 4 portions to do the blending/grinding. When you blend them, the chick peas can tend to go to the side of the blender so shake the blender a little bit every so often to move them around and back in the area of the blade. Then, once each portion is grinded, I pour them out into a mixing bowl. You may not be able to get them perfectly ground up and may notice some bits of un-blended chick peas but I found that this provided a crunchiness to the finished product and wasn't bad at all. Then I added the rest of the ingredients (the honey, peanut butter, baking powder, vanilla extract...all but the chocolate chips) into the chick pea mixture. I then used an electric mixer to mix all the ingredients (but the chocolate chips) together. And wow did it ever look like cookie dough! I then added dark chocolate chips and mixed the cookie dough around with a spoon. I only used about 70-80grams of chocolate chips. You can use as many as you think your batter may need but I thought 90g worth of chocolate chips would be too much for the amount of batter I had. Just a side note: make sure you use gluten free baking powder if you have a gluten intolerance. Here is what the dough looked like: Now, we have a fan assisted oven so I preheated the oven to 160 degrees for the fan oven. The recipe also says to form the dough into balls but I decided to try shaping them like cookies for the first batch and dough balls for the second batch to see the difference (I was curious as to why the recipe said to make them as dough balls and not cookies).
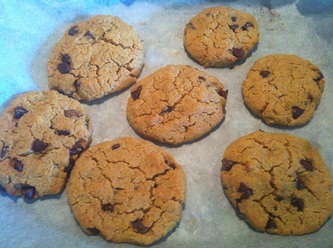
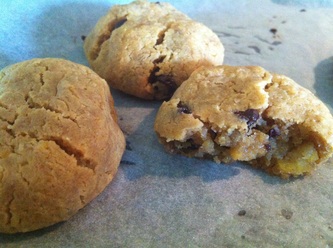
Make sure when you are working with the dough and forming them that your hands are wet as it helps make it less sticky and form them easier. I found that at 160 degrees (fan oven), they took about 20 minutes to bake rather than the 10 it says in the recipe. But if you have a regular oven then it may only take 10 minutes. I kept checking on them and they were still quite soft and didn't seem to be cooking but after about 20 minutes, I decided to take them out (both the cookies and dough balls) and let them sit for a couple of minutes and they became firmer. While they are cooking, you will notice that the cookies crack (similar to that of a ginger snap) but they still manage to stay together. I am pretty sure you don't need to worry about overcooking them as they don't seem to burn easily. The cookies were a complete success and absolutely delicious and quite peanut-buttery(obviously). The recipe does not yield many cookies, but I assure you that they will fill you right up and you definitely do not need many. They are VERY rich (but maybe that is because I used dark chocolate chips) and I made these before making dinner. After eating 2, I was absolutely FULL without a need for dinner, so feel free to form them quite small. If I use dark chocolate chips again, I will probably put a smaller amount as they are very rich. As you can see in the photo below, the cookies I made were average size so it may be a good idea to make them smaller. The dough ball size is actually perfect (and maybe that is why the recipe encourages the dough to be formed into a ball rather than a cookie) but I found that it doesn't affect the baking process if you flatten it out and shape it like a cookie. I have become a big fan of this recipe and will definitely be making these cookies again in the future. Highly recommended! They also take very little time to make. It must have taken about 10 minutes at the most to prepare the batter. And the best part about this recipe: You can lick the beaters all you want as there is no raw egg in the mix! Let me know if you try them and how they turn out or if you have any questions! Photos and calorie count below. Click on the images for a description! Enjoy and Happy Cooking! |
Food Categories
All
Archives
November 2016
|
Oh, Poppycock! - Life. Adventures. Merriment


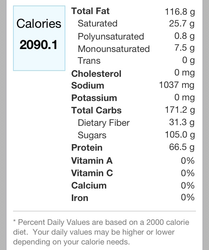
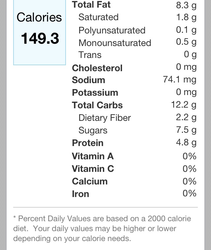
 RSS Feed
